Global Settings.
To access the XrmToolkit settings page press the 'XrmToolkit Options' button found under the main 'XrmToolkit' menu at the top of Visual Studio:

General Tab

-
When a solution is opened that is linked to CRM, this setting tells XrmToolkit to automatically prompt to logon. In some instances, .Net Demon has been known
to cause issues while opening a linked Visual Studio solution. Disabling this feature solves the locking issue associated with .Net Demon.
-
XrmToolkit can automatically query CRM for any changes to the metadata and update the local cache upon logging into the CRM organization.
The query occurs asynchronously in the background when enabled.
-
Choosing this setting allows you to see the progress of the metadata being downloaded from CRM, but doing so increases the time to download. The is because entities
are downloaded one by one instead of in bulk. The progress is shown in the status bar of Visual Studio.
-
You can optionally choose to disable the progress window when publishing.
-
In order to use ILMerge for merging assemblies used in a plugin, ILMerge must be downloaded and the location specified here.
-
You can specify your preferred programming language here so that it will always default to this when creating new solutions or projects.
-
JavaScript and CSS minification can occur in the following situations when a file is published to CRM:
- Never
- Always
- Only in Release Mode
This global setting is used as a default when creating new solutions and projects. This setting is applied to each JavaScript or CSS file that is downloaded or created based on the setting for the Solution.
Once the file has been setup, this setting can be changed on a file-by-file basis. For more information see the documentation here.
- XrmToolkit windows are themed based on these settings. You can choose to theme the windows based on the currently selected Visual Studio theme, or choose a theme of your liking from the list of available choices.
File Paths Tab

The file paths specified here will be used as the location for saving files within the project structure. These global settings get copied to a new project when it is created or linked. You can change these settings for a particular group of files before you download them
by modifying the 'File Paths' tab on the 'Add Items To Project' window. To learn more see the documentation here.
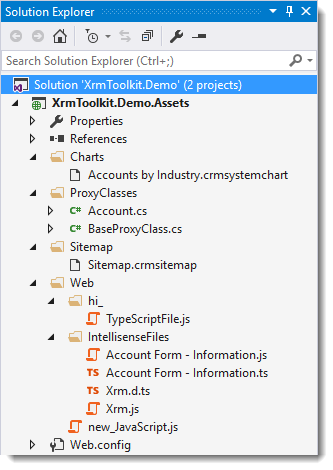
The following screenshot demonstrates how items will be
downloaded and saved to a project. As you can see in the instance where Web Resources have been created using a simulated folder structure, they are downloaded and stored
in a real folder structure including the publisher prefix:
When you create a new web resource in one of the sub folders and go to publish it to CRM, XrmToolkit will suggest a simulated folder structure based on the location of the
file in the project:
Linked Files Tab

-
When the metadata is either manually or automatically refreshed, XrmToolkit also checks for changes make to any linked forms for which there are intellisense files,
either JavaScript or TypeScript, downloaded in your solution. If there are changes and this option is checked, the intellisense files will automatically be updated to
reflect any changes to the linked form.
-
XrmToolkit stores both entity and attribute metadata from your linked CRM Organizations. To learn more see our documentation here. You can manually refresh
the metadata or the metadata is automatically refreshed when logging onto the organization depending on your setting on the "General Tab" shown above. When the metadata is refreshed
you can optionally choose to have any proxy classes that are linked in your solution automatically updated with any changes from the metadata.
-
You can check this option to automatically update and publish any linked web resources or reports when you save the file in Visual Studio.
-
You can check this option to turn off the auto format of JavaScript code that is downloaded from CRM.
-
XrmToolkit can generate proxy or early bound classes based on either the CrmSvcUtil program included in the CRM SDK or a custom generator used by XrmToolkit.
-
The early bound class names, properties and methods can be named using the following:
- Display Name
- Schema Name
- Logical Name
-
When generating proxy classes, you can choose to use the display names, or the logical names at both the class and property levels. This is a global setting that gets copied
to the project level when creating new projects. You can also change this setting at the time that you download any new proxy classes. For more information see the documentation
here.
You can also optionally specify a specific naming pattern when generating the proxy class names. The default is to just use either the display name or logical name depending on
the setting above. You can specify a prefix or suffix by changing the naming pattern. For example, if you wanted the class name to be [Display Name]Entity then you would specify
{0}Entity as the naming pattern.
- You can specify the sub-folder that is used as the default for placing all the early bound classes.
- You can specify to default using a base class that plugins would inherit from.
- You can specify to default using a base class that workflows would inherit from.
