Plugin Project Features.
Options for an un-linked project
The following context menu is displayed when right-clicking on the project node of a class library code project that has not yet been linked to a CRM organization:

- Add Proxy Classes to Project - Opens a window allowing you to generate multiple early bound classes at once.
- Link Items to CRM - See the Common Project Level Actions documentation for more details.
- Add New Plugin Or Workflow - Displays a dialog to walk you through creating a plugin that also creates the plugin configuration for registering the plugin once completed.
- Add Plugin Assembly to CRM - Shows a dialog window that allows you to register the assembly in CRM and optionally specify whether to use ILMerge to merge referenced assemblies.
- Switch to a different CRM Organization - Allows you to switch to another already linked organization.
Add Plugin Assembly to CRM
By pressing the 'Add Plugin Assembly to CRM' button a window will appear with options for uploading the assembly to CRM.
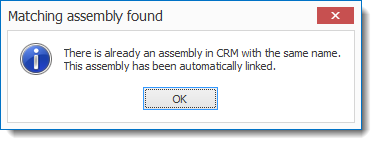
If an assembly already exists in CRM with the same name then you will be notified that the assembly will automatically be linked and publishing
the assembly to CRM will updated the linked assembly:
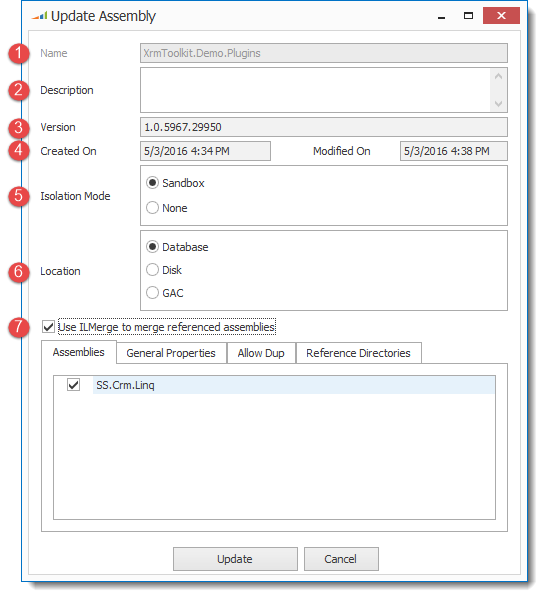
- Read-only name of the assembly. This comes from the project settings in Visual Studio.
- Description of the assembly in CRM.
- Version of the assembly determined by the project settings in Visual Studio.
- Timestamps for both the created-on and modified-on for the assembly in CRM.
- Determines the isolation level for the plugin assembly to run in CRM. For CRM online the 'Sandbox' is the only option allowed.
- Tells CRM where the plugin will be physically located. The default is to register the plugin assembly to the CRM database.
-
You can choose to automatically merge the assembly using ILMerge every time you 'Build and Publish' to CRM. You will first need to download and install
ILMerge to be able to use this feature. You can download ILMerge from here.
For more information regarding the use of ILMerge with XrmToolkit please see the documentation here.
Options for a linked project
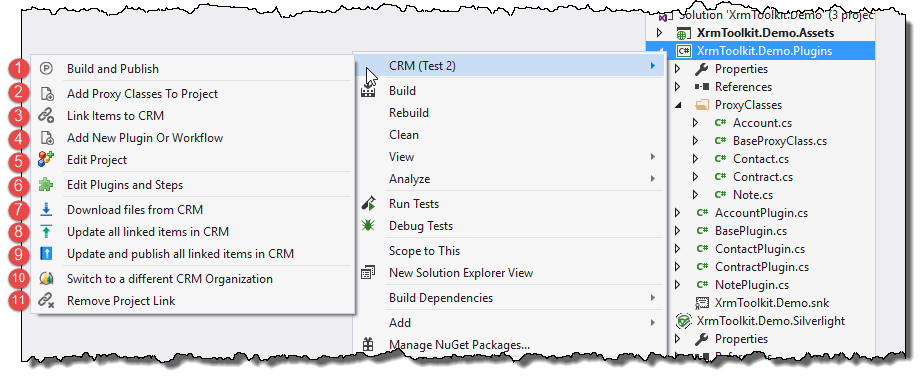
The following context menu is displayed when right-clicking on the project node of a class library code project that has already been linked to a CRM organization:
-
Build and Publish - Builds the plugin assembly and publishes the DLL to CRM. If ILMerge is selected then the ILMerge process will be injected and the merged DLL will be uploaded to CRM.
You can optionally specify MSBUILD actions during the build process. To learn more about using MSBUILD with XrmToolkit please see the documentation here.
- Add Proxy Classes to Project - Opens a window allowing you to generate multiple proxy or early bound classes at once.
- Link Items to CRM - See the Common Project Level Actions documentation for more details.
- Add New Plugin Or Workflow - Displays a dialog to walk you through creating a plugin that also creates the plugin configuration for registering the plugin once completed.
- Edit Project - Opens a window allowing you to change the different properties regarding the plugin assembly and registration.
- Edit Plugins and Steps - Opens a dialog displaying only the current assembly in the Plugin Registration Tool. For more info see the Edit Plugins and Steps documentation.
- Download files from CRM - See the documentation here.
- Update all linked items in CRM - See the documentation here.
- Update and publish all linked items in CRM - See the documentation here.
- Allows you to switch to another CRM organization already linked to the Visual Studio solution.
- Remove Project Link - See the documentation here.
